Showing posts with label projects. Show all posts

Tuesday, May 29, 2012

New adventures

This year is not my first vending at a Saturday market. Yet it is the first year for my own business.

I have been busy creating many crochet goodies, from hats to toys, and beyond, so much success, I nearly sold out of my rattles, and had to make stock continuously to no run out of my animal hats!

This week, between school finals, and my baby shower this weekend, I will be coming up with new designs, from foxes to koala bears, maybe even a penguin and polar bear or two. my goal is to have the entire side of the tent (10ft) covered in hanging hats! More photos to come!
 

Wednesday, November 23, 2011

Winter begins and I miss the Flowers!

There is this wonderful trend that has been getting stronger every winter in my area, those lovely headbands that keep your ears warm and cozy, and are super cute to boot! Every pattern I have found that made me happy, but none of them were the "right" one... so I designed my own, and I worked up several and tried to sell them at the market I mentioned in my last post. The one thing I couldn't get right was the flower...this one was too flat, that one takes too long to make, the next one is look large and poofy, it's unstable on the headband... so I finally figured it out... I'll make my own pattern.


Chain 25, dbl in 4th from hook (counts as dbl and ch 1) chain 1, dbl in next chain, chain 1 repeat to end. chain 1 turn,

dbl in ch space, chain 1 2 dbl in same chain space, v made, *2dbl, ch 1, 2 dbl* in next ch space. repeat to end.

chain 1, 3 dbl in chain sp, ch 1, 3dbl in same space (petal made), *3dbl, ch1, 3dbl* in next chain space, and in each across. chain 1, fasten off, leaving about 10-12 in tail.

Use tail to weave in and out of base chain. your flower should curl up, pull tail tight, and use to tack the spiral in place how you like it, start the curl super tight int he middle, and loosen the flow as you work to the outside. tie off once you have it steady how you want it. Stitch this to your hat, headband, purse, or blanket. Or glue it to a hair clip for interchangability on your hairstyle or hats and such.

Pattern is untested, let me know if you are confused, or I made a mistake.

Tuesday, November 22, 2011

First Craft Show of the Season

I was invited to do a craft show last weekend. It was a last minute choice, and I worked my butt off to get enough product, fearing that I wouldn't even be able to fill the table.....I had a box of product that I was not able to show, I didn't have the room!


I guess I was prepping for a larger space!

I learned several things from this show... first, don't freak out, asses your space requirements, and duplicate your set up. If I had taken my product up to the studio, and laid it all out on my table, I would have seen that I had plenty of product.


This was the left side of my booth, I had a record bowl full of candy, a second record bowel full of page corner bookmarks. These were a product of great confusion, even though I had a book displaying how they worked, they seemed to confound my customers.

I also had several headband ear warmers, a twig tree full of key fobs, and 2 record stands holding my giant paperclip bookmarks.

I taught my husband how to sew, and he made up 20 3-6 in rice and lavender heat packs, in 5 different fabrics.

I also had some small candy tubes, made from crystal Light containers. I will take photos of each of these projects with a short written tutorial over the course of the next week or so.

This is the right side of the booth. The shelf was a super find at my mom's 2nd hand shop, she was going to throw it away, and I snagged it up. the paint is rough, but it adds character. the top 2 shelves are filled with handmade holiday cards, I will show these individually in the blog posts from the next few days. I filled the bottom shelf with coaster sets, made from recycled flooring tiles and scrapbook paper! These make great hostess gifts, and are water resistant.

I also had a couple of hats, the pattern for 1 of the three hats here is listed in the blog as the Tundra. The other two I need to write up patterns for. On the side of the shelf is a couple of Pom Pom scarves made with Pomp-a-doodle, and the hats on top are some basic beanies, with some decorative stitch experimentation.

The stand on the second shelf is made from a water goblet glued between 2 melted records, it is full of flower hair clips, and hair pins. These work great for accenting headbands.

The top of the first shelf has a couple of wristie-earwarmer sets, you can find the pattern for those here.

The second lesson I learned was straight from the pages of my marketing texts... people in the US shop from right to left, they go in the direction they drive, and they have to cross less traffic if they start at the right. I was int he left corner of the room in the show... people would circle the the right, and move around, hitting some of the corporate consultant style businesses before they got to me, therefore, they'd see the mass produced "cute" winter-wear, buy it, and have already spent their money by the time they found my booth, with handcrafted, higher quality, but less expensive headbands and hats.

Also, because the previous booth had their god mass produced, they were ALL EXACTLY THE SAME... no variance in design or pattern, only color. Guess I need to work on my consistency, and my color choices. Most people apparently prefer solid colors to mixed or gradient colors.


I did get some great networking done though. Get set up for another show on Dec 9, and got asked to consign some of my things at Roller Doll Skates, a store that caters to roller derby girls.


Tuesday, November 1, 2011

Wristwarmers and Earwarmers

Pattern is up! Need to sell this one, sorry I can't give it away for free, but I gotta pay my bills somehow.

Check it out! And help a Poor College kid pay for her Ramen!


Etsy:http://www.etsy.com/listing/85124977/pattern-crochet-pattern-for-earwarmer
Ravelry:http://www.ravelry.com/patterns/library/perfect-fit-earwarmer-and-wristies


Sunday, October 9, 2011

Mascot

As this blog is called Gnomes at my homework, I think it's high time to get myself a GNOME! Now, I know that to most people, gnomes are a thing of fairyland, and imagination... and while that might be true for you, must it be true for all people? I think gnomes deserve to go on adventures with people, big people adventures!

He or she could have gone on a wonderful 5.5 mile bike ride today with me, and sat in an outdoor shopping mall for a while!

I will be making a gnome army! I will gift one whenever I can, and I will travel with the 1st one, as leader of my gnome army! I do not have him home yet, but I will post pics when i finish him, or her!

I am doing the leader in a great and fashionable outfit of green and brown! Using Impeccable yarn, by Loops and Threads!

The colorway looks like this:


Tuesday, September 27, 2011

Moving SUCKS

I hope you'll accept apologies if the following 2 weeks in posts are a bit short, or non-existent.....

We hope...........Taken from Ephemeral Workbench


I am moving, again... while going to school... and prepping for a holiday craft show... time to live out of boxes for a few weeks.
 

Wednesday, September 21, 2011

Sabrina Gloves!

Got a custom order today, decided to write a pattern!

Well, more of a recipe...I do those a lot!

Here it is: the Sabrina Fingerless Gloves

Sabrina Glove

This is a very simple, easy, nearly-mindless crochet project. Very little counting, and several rows of repetition.

Start with your favorite yarn, make sure that it is comfortable against the inside of your wrists. Chain until you feel it is long enough from the webbing of your fingers (if you are going to add the individual finger holes) to wherever you want it on your forearm, or from about the first knuckle of your fingers to wherever you want it on your forearm...

I chained 35. It should be an uneven number.

hdc in the 2nd chain from hook, (this first chain counts as your first hdc, now and throughout) *skip a chain, 2 hdc in the next* to end (I messed up on my start chain, I chained 34, should have chained 35.. if you do this, don't worry, you can fudge it, just do 2 hdc in the last oddball chain.) chain 1 turn


repeat last row, until you get to the length you want it before your thumb

OR

Keep going until it wraps around your wrist comfortably. we can create the thumb hole when we stitch it up.

If you have chosen the 1st option, you will 2hdc until you reach where you want your thumb hole, and you will chain 6 and then 2hdc where you would normally 2hdc, continue to end with pattern. chain 1, turn

on the way back, continue pattern, and when you reach the thumb hole chains, do your normal pattern into the 2nd, 4th, and 6th chains. then continue onto the normal location for your hdc's. to end.

continue in pattern until you reach your desired length to go around the wrist.

here you have 2 choices as well.
1) you can whip stitch the gloves up the side, if you have chosen to do your thumb now, then leave out about an inch unstitched and then continue the stitching when you get to the end of your thumb hole.

2) you can single crochet or slip stitch the edges together. if you are doing a thumb in this step, leave about an inch open for your thumb.

if you are doing fingers, sc around the edge closest to your thumb hole. I did 2 rounds before I started my fingers.

This might get confusing, and I am trying my best to explain it, so I am sorry if it's hard to understand.

count how many stitches around the edge. You will divide this number by 10. Then you will take that number and figure that the fingers will be two of that number in the middle, and 3 on the outside edges. sc around to the thumb edge, then sc #, sc across the opening into the corresponding sc. sc # stitch across to coresponding sc, making 4 finger holes total.

Stripe Pattern here: 4 blue, 1 purple

When you get all 4 holes finished, begin sc around 1 finger hole, in each stitch, until you get the length you want, then slst in next stitch, leave about 3 in tail, and cut off. you will weave this tail in later.

Attach your yarn to the next finger hole, and repeat the finger hole process.

weave in ends.

Now, here is the fun part, embellish how you want. Ribbon. Buttons. Beads. Or, leave it plain...

NOTE: If you chose to do stripes, as I have, make sure to a)crochet over your ends to avoid needing to weave in later, or b) weave in VERY well when you are done, Your hands get a lot of beatings, so make sure your ends wont fall out and unravel your hard work!


For an extra finishing touch, you could do a few rows around the back edge in an accenting color. Just make sure that you do not crochet it too tight to fit over your forearm.


Sunday, September 18, 2011

Hometown Proud, but hometown cold.

Last year, at the time of the census, in my hometown, 24.5% of the population was under 18, of that, 10.5% of all of the population was living UNDER poverty levels. If you figure that is a population of 71,892 People, that is 17,614 children, and 1850 of those children are living under Poverty..... I think we should see what we can do to help these children.


I have asked my friends and family to knit, crochet, sew, or purchase as many kids hats as they can, to donate to the Family Access network in our area.. I can only hope to make their lives a little bit warmer!
 

Tuesday, September 6, 2011

Summer catch-up!

It seems that my summer ran away and hid... it got a late start, and now it is nearly over! School starts back up for me in a week and a half!


I have been trying to do EVERYTHING and therefore have gotten NOTHING done! Go figure, right?

I have restored my account on Etsy, and listed a few hats, hoping to get some other stuff on there soon.

And, I received 2 custom orders in the last week!

One is for a pair of Mary Jane style slippers in rainbow stripes (a trade for crafty goodness of Chrissy)

And the other is for 2 custom designed Owl Cowls for a friend from high school. (Shantae)

I am super excited, because with custom orders, I get to communicate with the customer, and get a feel for JUST what they want! And I know that they will be enjoyed, because in this case, I know both of the customers personally.


Tuesday, August 23, 2011

Mission Stashbust!

So, summer term is almost over, I have the worst sunburn of the season, and I have made the commitment to participate in a holiday show in November. Lots going on.

Here is my plan!

I have a large plastic tote of yarn, 3/4 of it is cheap acrylic that is uncomfy to wear. So I making it into purses, and Christmas stockings.. at least... thats the plan.

After my last final...

And I'll post pics as we go!
 

Monday, August 8, 2011

Tundra: a pattern


I posted about Tundra, Caramel, and Woodland hats.


I promised a pattern for each of those hats... and so here they are!


I will post 1 pattern each day until I have them all up.

Tundra:

Round 1: ch 3 (counts as base, and first dbl) 11 dbl in 3rd chain from hook, slip into top of start chain.
Round 2: chain 2 (counts as first dbl) dbl in base of chain 2, 2 dbl in each stitch around, slip to top of first stitch.
Round 3: chain 2, dbl in base of chain. *dbl in next stitch, 2 dbl in next* to end, slip to top of start chain
Round 4: chain 2, dbl in base of chain, *dbl in next 2 stitches, 2 dbl in next* to end, slip to top of start chain
Round 5-8: repeat previous round, EXCEPT, add another dbl between each 2 dbl for each row.
Round 9-10: chain 2, dbl in each stitch around, slip to top of begin ch.
Round 11: (decrease rounds) ch 2, *dbl in each of the first 6, dbl2tog* to end.
Round 12 - ?: repeat round 11, decreasing the number of stitches between the dbl2tog
Round ?-?: Building your brim, details below

The hat pictured above has a simple, 2 in dbl brim. For this, you dbl in each remaining stitch, sl st to top of chain, dbl around, fasten off, weave in ends.

There is also the option of a more stable brim, from the end of your dec round, you will sc in each stitch around, NOT connecting the end of the row, but continuing the spiral.

OR you can do a sturdy Tunisian style brim, this give stability and fashion. and offers a better base for extras such as buttons or ribbon.

You will finish your decrease round, and sl st to first ch.
chain 4 (5), then start your Tunisian.
insert hook in first loop, yo and pull loop through (2 loops on hook)
insert hook in next loop, yo and pull loop through (3 loops on hook)
insert hook in next loop , yo and pull loop through (4 loops on hook)
If you only chained 4, follow this, if you chained 5, do the last step 1 more time, then move on to this.
insert hook in first stitch of hat base, yo and pull loop through.
yo, pull through 2 loops, yo pull through 2, until only 1 loop remains.
repeat this process using the "bars" you will see forming on the front of the work to build into. This stitch will cause a mild curl to form, but when you are finished, you will not be able to tell.

Do this last step until you reach the last stitch before the hat brim began, fasten off, and cut leaving about 10-12 inch of yarn left. use this to sew up the 2 edges, and add some accent to hide this seam if you'd like.

This pattern can easily be made for a small head, by following the pattern, but only going to to 5 or 6 rounds before starting decreases.

If there is anything that I need to clear up, message me on Ravelry or leave a comment!

Want to track your progress?

Ravelry: Tundra Tam

Also, when in need of a photo prop to hold the hat... and there is no willing child or roommates, I can always rely on my hubby's Nalgene to stand perfectly still.
 

Sunday, August 7, 2011

HATS HATS HATS HATS! And a Hair clip or 20!

I have been a hat making maniac the last few days... I took a look around the WWW, and didnt find ANYTHING I liked. So what's a girl to do?

MAKE HER OWN PATTERN!

This is what I came up with:


This is Tundra, crocheted with Lion Brand Tweed Stripes... a super soft, super warm 100% acrylic striped tweed... (go figure read the name) I bought it at Wal-mart for 3.95 a ball or so.


This is Caramel, same details as above, but in the Caramel colorway (discontinued)


This is Woodland, same details as above, slightly different pattern (not by much) and this yarn is also a discontinued colorway.

That's what I have for now, however, I will post the patterns over the next week or so.

I have another pattern all together on the hook now. Still need to try to knit this yarn, just to see how it looks that way.

Tomorrow, you'll see my hairclip madness. I have 4 shops in the local area who want to consign my hair clips, so I am crocheting them up like a crazy woman! I'll have a pattern for the clips, and a tut for the boards I have backed them with in just a day or two.

Thursday, July 28, 2011

Food for thought: copyrights


Now... the question I am posing is this: if you are looking for a design, but don't find one, and end up using another persons work for inspiration does it count as copyright infringement? I have an uncanny ability to look at a project for a few min, decipher it, and then recreate something very similar without ever paying a penny for the original pattern. Since I am not using their pattern, is it copyright infringement if I sell the items I make from the inspiration of the item?


Thursday, July 21, 2011

denim daze!

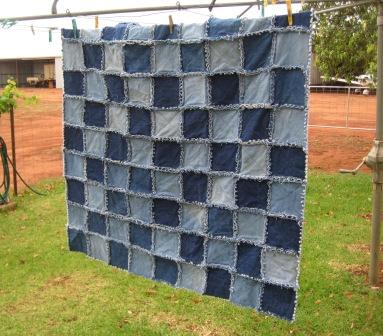
Ok, so I can't give you the tute yet, but it is on its way... has anyone else seen these quilts?


Well, I am making a tote bag from this concept... only I am drawing on the blocks with my own designs! Super excited to show everyone this rad idea! whoever thought of this was a genius!


Monday, June 27, 2011

A lot going on...

Consumer behavior: Boring

Core Fusion: Exhausting, but invigorating

A wedding:


A gas crisis: ran out of gas, and out of money to get gas, and needed to be in school, but couldn't afford to get there... a friend rescued us.. again. Thanks Amy.

A stress induced panic attack: See above

A painful chiropractic adjustment: Just as it sounds.

First hot temperatures in several months, and they are consistent.


Salsa, beans, and jam galore... Pictures on hubby's comp, will link when I get them from him.

New feather earrings:


Chicken and dumplings for the first time:


French Onion Soup, for the first time, ever, making or eating:


And much more...


See? A lot has been going on.